All of us have heard the word SFC scan even if we don’t know what is it. It is a great solution to many problems and errors. It is a helpful tool in Microsoft Windows it stands up for System File Checker.
With this, you will be able to scan and fix corrupted system files. In almost every error solution it is recommended to run an SFC Scan. But what if instead of removing the error it shows you another error!! In this article, we are gonna learn more about the SFC scan and its errors and their solutions.
Contents
- 1 What is Meant by Windows Resource Protection Could Not Perform The Requested Operation Error?
- 2 How to Fix Windows Resource Protection Could Not Perform The Requested Operation Error
- 3 Conclusion
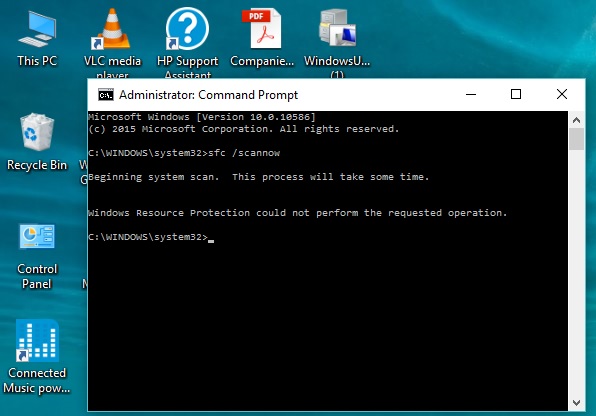
What is Meant by Windows Resource Protection Could Not Perform The Requested Operation Error?
Every error means interruption or a failed process. This error appears when the SFC tool gets stuck somewhere it could be a system file it could be a loop.
There are a large number of processes running in the background if any of them fails it will impact the whole system. This is what happens with the SFC tool as well. Since this error will pop-up in between a scan hence you will not gonna be able to use it.
How to Fix Windows Resource Protection Could Not Perform The Requested Operation Error
As I have mentioned above this error can appear due to a number of reasons. There is a very slight chance that you know the cause of this error. We bring you some easiest solutions for common causes. Just follow them and your problem will be solved. You can try all of these solutions below. Make sure you follow each step carefully.
Method 1 – Run CHKDSK Utility
This solution is for disk problems as you have read above your storage could also be having issues which triggered this error. CHKDSK is a Windows inbuilt tool that checks the storage for issues and fixes them. By running this utility we will scan for storage/disk issues and fix them. In order to run CHKDSK simply follow the steps below.
Read Also:
Step 1: Press Windows key and type cmd and hit Enter.
Step 2: Right-click on the first option and select Run as Administrator.
Step 3: Now type in the following command and hit Enter.
chkdsk (disk name e.g C or D): /r
Step 4: Now it will prompt (y/n) press y and hit Enter.
Step 5: Close all the applications and Restart/Reboot your computer.
Step 6: Now on the next boot checking disk process will start it will take some time.
Warning: Do not turn off your computer during disk checking.
Now you have successfully checked and repaired all faults of the disk drive. Check if the problem still persists if it does then be sure to check out all other solutions as well.
Method 2 – Modify the Security Descriptors on the winsxs Folder
As I have mentioned above if the SFC tool gets stuck in any file then it will trigger this error as well. This folder winsxs needs permissions to access because it is situated in a special folder. If the SFC tool doesn’t have permissions to access it then it will pop-up an error. Hence we are going to modify the settings so that SFC can access winsxs folder. In order to do that simply follow the steps below.
Step 1: Press Windows key and type cmd and hit Enter.
Step 2: Right-click on first option and select Run as Administrator.
Step 3: Now type in the following command and hit Enter.
ICACLS C:\Windows\winsxs
Step 4: Once the process completes the Restart/Reboot your computer.
Now you have successfully given permissions to SFC try to run an SFC scan if the error still pops up make sure to try other solutions as well.
Method 3 – Perform A Repair Install of Windows
If your Windows operating system is having problems then most probably it could be the cause to SFC scan error because if a system file is damaged or missing both solutions above will not work. In this solution, we will install windows on already installed Windows. It will replace all the windows files which will basically refresh system files. With the removal of old files, an error will be removed as well. In order to install Windows simply follow the steps below.
Using Windows ISO File:
Step 1: Download Windows ISO from Microsoft Website.
Step 2: Mount that ISO file and open it.
Step 3: Now click on setup.exe and follow the procedure.
Step 4: Let the process finish.
Using USB Installation Media:
Step 1: Download Media CREATION Tool from Microsoft Website.
Step 2: Run the tool.
Step 3: Click on Create installation media for another PC.
Step 4: Choose your version of Windows and download it on your Pen-drive.
Step 5: Follow up on the Procedure to install Windows.
You have successfully performed the repairing of Windows. Your system did not have lost any of its data. Try an SFC scan again if it fails the check out all other solutions as well.
Method 4 – Clean Install Windows from Scratch
If the above solution didn’t work out for you then you have to perform a clean install of Windows from scratch. It will be the same as above however none of your old apps and settings will be there. It is recommended that you take a backup of your important files because we are going completely wipe your storage drive. In order to install Windows from scratch simply follow the steps below.
Warning: Do not interfere while Windows is installing.
Step 1: Download Media CREATION Tool from Microsoft Website.
Step 2: Run the tool.
Step 3: Click on Create installation media for another PC.
Step 4: Choose your version of Windows and download it on your Pen-drive.
Step 5: Shut Down your computer.
Step 6: Plug in the USB drive and start it again.
Step 7: Start pressing Esc until boot options appear.
Step 8: Select your USB drive and hit Enter.
Step 9: Now click on install now and start the procedure.
Step 10: Format the drive you want to install in it.
Step 11: Follow up on the procedure.
Congratulations you have successfully installed Windows in your Computer from scratch. Now try to run an SFC scan again.
Method 5 – Enabling Windows Module Installer
Sometimes if your Windows module installer is disabled then the SFC scan will not be able to run properly because Windows uses modules to run many functions. Hence we are going to Enable Windows Module Installer. In order to that simply follow the steps below.
Step 1: Press Windows key and type services and hit Enter and choose the first option.
Step 2: Now locate Windows Module Installer and Right-click on it.
Step 3: Now click on Properties.
Step 4: Left click on Start.
Step 5: If you can’t select start and it is Disabled click on disabled and choose Manual and then click on Apply.
Step 6: Make sure to start the service and close the dialog box.
Now you have started the Windows Module installer now try to run SFC scan again. If you are seeing the same error again then try other solutions as well.
Method 6 – Executing Commands
If nothing else is working for you then maybe your system needs to be given all the paths and instructions manually. In these solutions we are going to execute some commands. Simply follow the steps below.
Step 1: Restart your Computer three times simultaneously it will lead you to Recovery options.
Step 2: Now locate and open Command Prompt.
Step 3: Now type in the following command and hit Enter.
SFC /SCANNOW /OFFBOOTDIR=c:\ /OFFWINDIR=c:\Windows
Step 4: Let the command run and Restart/Reboot your computer.
Now check by running a scan if the error is still showing up or not.
Note: You can also try to SFC Scan in safe mode.
Read Also:
- What Happened to Karen on Second Chance Retreat
- 0x800705b4
- A Person’s Metabolism Remains Constant Throughout Life
Conclusion
In this article, we have learned about the Windows Resource Protection Could Not Perform The Requested Operation error and how to fix it. At the end of the article, I hope all of you have found your solution for this error.
If after all of this if you are still seeing the same error then there is a high probability that your storage drive is having hardware issues.


